Gluten-Free Cooking For One

Celiac And The Single Girl, Or: How To Make Food That Does Not Suck For One Person {Although I Suppose You Could Feed Other People, Too}


1 Comment

Well Hello There, Pork Pie

Sorry it’s been so long; I’m back once again like a renegade master (or something like that). If you’re not part of my soi-disant “real life”, I can both explain the break and catch you up like this: starting in mid-March of last year, I was having rather irritating pain in my abdomen. Then it started spreading and getting more pervasive, and more intense, and altogether just MORE of everything. Staring April 1, I had a period of a couple months of intense pain and not-fun-ness that can best be described by this list: 3 ER visits, 1 hernia, 1 ulcer, and 7 kidney stones. I was on opioids the whole time, so my memories of last Spring are cloudy to say the least. Then in May, I got a job. About the time I started feeling competent there, I got promoted, and had functionally two part-time jobs, both in retail, just in time for Fall and the start of the holiday sales push.

I feel like I’m now coming up for air, a bit…so it’s time to start cooking again! Hopefully I won’t celebrate the Solstice with another season of WTAF IS HAPPENING TO MY BODY.

My eating habits are largely informed by what I’m watching on TV; when I’m obsessed with medieval history (this happens often – for example, Wolf Hall is on pretty much endless repeat over here. Or any of the “Farm” shows from the BBC, and Tudor Farm and Green Valley are two favorites.), I want to eat what’s in the TV shows. I tend to pick up handicrafts that go with the period (blackwork embroidery and weaving). When I’m watching Regency shows, the same applies. Recently, I’ve been binge-watching “Escape To The Country”, a show about people from British cities escaping to the countryside and buying rural homes, all with lovely budgets. The landscapes are to die for, and the shows include a bit of local history and color, so that also hooks my interest. Last week, I watched one where they went to Melton Mowbray and tried the pork pies, which are a historical regional specialty. Pork Pie action here.

If you can’t see where this is going, I’ll be quite surprised.

I could say I made pork pies in honor of Pi Day, but I didn’t. I made them in honor of my utter lack of ability to resist food in TV shows.

The first pie, the tester, was – well, it wasn’t bad, but it lacked flavor. So tonight I made another, and I think this shows a lot of promise.

Here’s a loose recipe. I never really do a very good job of measuring until the third of fourth time I make something, and this is still Tester Town, so expect some inaccuracy.

PORK PIES (gluten free, of course)

1 lb pork (use a cut you like. I found pork roast on sale and used that)
bacon, lots (I used uncured, about 1/2 a package)
sweet onion
shredded cheddar cheese
mashed potatoes
apples, sliced and peeled
salt/pepper
garam masala
whatever other spices rock your boat

METHOD

I start by chopping up the raw bacon and pork (I cube the pork). Also, chop the onion (I like a rough, uneven chop). I sliced and peeled red apples (can’t remember what variety, use one you like; mine are fairly sweet but still crisp and a little tart).

I fried up the bacon and the pork until they were fairly well cooked, while preheating the oven to 425F. Last time, I sauteed the apples and onions until they were soft, but I felt the pie lacked definition and was kind of a mushy soft whatever, so this time I left the apples and onions raw. Will let you know if that was a good idea. 😀 I like to add my spices to the pan, so I threw garam masala (sweet/spicy mix that has cinnamon and lots of other goodies in it), salt, and pepper in while I was cooking the pork.

I didn’t want to use a pie dish a) because I didn’t want a pie crust and b), I had waaaay too much stuff inside for a pie pan. So I started layering the items in my beanpot (normally used for applesauce and baked beans). Pork, apples, bacon, cheese, some onions. Repeat.

On top, I spread the mashed potatoes like a lid (well – last time. This time, I didn’t have enough mashed potatoes and I made them too runny; so I kind of poured them into the pie. Hey, it’s still potatoes. lol) and then put cheddar cheese on top of that.

Put the lid on, then put the whole shabang into the oven for about 20 minutes, and after turning the oven off, removed the pot lid so the top could brown up. When I brought it out, it was bubbling and gorgeous. Be warned, there will be lots of juices in this pie as the inside cooks down. I like it, it firms up into a gorgeous sort of jelly in the pie. You might not be a fan.

IMG_2729

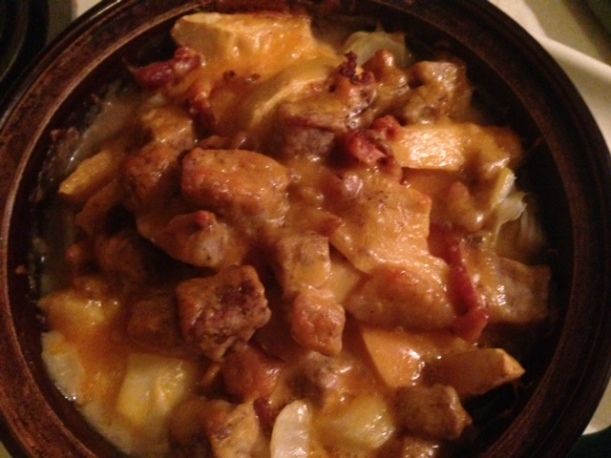
looking FAB despite its lack of lid

It smells amazing. I’ll let you know what it tastes like after it cools and sits for a while.

Snaps!

my assistant is eagerly waiting to try our creation


1 Comment

Rice Cooker Kichari

Yummmmm!!! I just finished making this, and it’s delicious. Much creamier than my normal kichari, because my stove-top pot is too small for a proper batch, and it boils all over.

Well. So did this.

But the end result is worth it, and I didn’t have to stand there and *watch* it boil over. I was in the other room, doing something more productive while it boiled over. 😀 I’ll figure out how to fix the boiling over thing, but in the meantime, if you don’t mind a bit of a mess, this is THE STUFF here.

I took half a cup of mung beans (split and shelled) and half a cup of rice — completely forgot to soak either, but it worked out juuuust fine, except for the oft-mentioned boil over — and put them in the rice cooker with my standard 2 cups of water (for cooking rice). After a moment’s pondering, I added another cup or so of water, just for good measure and so I wouldn’t scorch the pooptarts out of my rice cooker. Plugged it in, turned it on. Left it alone. (My rice cooker only has one setting: “on”, so no complexity here).

In the meantime, I’d put some olive oil (I’m out of ghee) in a saucepan and started it heating, and chopped up a large potato and put that in the microwave to cook. Sautéed sliced onions and some garlic with cumin seeds in the oil,then added a dollop (about 1 Tbsp) of bacon grease from the fridge. If you’re veg, then this is not for you. :} Sorry. I wanted a little more richness than I could get with just olive oil. Added turmeric, curry powder, salt, and some other goodies – what I had on the counter – and let the onions get soft. The potatoes dinged, so I threw those in too, to get the benefit of the spices and oniony-ness and good mojo. Let that finish up for a few more minutes, then turned it off and went to weave in the other room.

Shortly thereafter, I heard the ungentle hissing of an epic boilover, but I really couldn’t be bothered to get up and check… what could I do, other than wring my hands and say “oh, dear, it’s boiling over”? After about 20 minutes, the rice cooker clicked into its warm cycle, and I bustled into the kitchen to move it to another bowl before it could crust to the surface of the rice pan. Put in oil, onions, garlic, and potatoes, and stirred. After I combined the mixtures, I tasted it – needed more spices, so I added them to taste.

The texture is smooth and creamy, unlike the slightly crunchy way it turns out on the stove. It’s pretty bodacious and I am gleefully happy with this recipe. HOORAY!!


3 Comments

Crockpot Butter Chicken

I’ve been planning to try this for a while, and today was The Day. I picked a slow cooker butter chicken recipe and here we go.

The recipe I’m trying today is this one:
http://www.chefdehome.com/Recipes/597/restaurant-style-butter-chicken-in-slow-cooker

restaurant-style-easy-indian-butter-chicken-slow-cooker-chefdehome-4

This is chefdehome’s image — not mine.

It looks yummy, and — if the smell from my kitchen is anything to go by – will be delicious. I hate to say this, but I basically followed the recipe, so you might as well go over to chefdehome and check her recipe out. It’s already gluten free, because it has no hing (asafoetida), which is almost always cut with wheat.

Happy cooking! I’ll let you know how this is when it comes out of the cooker… can’t wait.


2 Comments

Kichari (Kichdi) – mung beans and rice

Another Indian veg recipe here! It’s been a busy couple of weeks and my stomach’s been wonky, so I’ve been mostly eating potato chips and meat rolls (ok, fancy name for sandwich meat rolled up) and finally I had a minute to cook last night. Whew!

I’ve been wanting to try kichdi for a while, so last night was the night. Kichari or kichdi is a basic dish, using mung beans (moong dal) and basmati rice. In India, when your stomach’s not feeling good, they might give you jeera rice (cumin seed rice) or kichdi to soothe your system. Jeera rice is easy to make in the rice cooker – just make regular rice, and before you turn on the rice cooker, add cumin seeds that have been fried in oil just until they crackle, dump in both seeds and oil. Many of the kichdi recipes I’ve been seeing call for a pressure cooker, and I don’t have one, so I made this on the stovetop.

You can add any vegetables you have, and I love potatoes, so I added those.

Here’s a link to a proper kichdi recipe – I adapted this one, given what I had and my limited time: http://www.vegrecipesofindia.com/moong-dal-khichdi-recipe/

INGREDIENTS

1/2 cup mung beans, split and rinsed
1/2 cup rice
1 small to medium onion, chopped
1/4 t Ginger (I used powdered because it’s what I had – add enough for your taste)
3/4 t Cumin seeds
1/4 t Turmeric powder
Hot pepper, if you like it hot, or chili powder
Salt
Water as necessary
Potatoes, precooked and cubed – you could also use raw, but then add them in time for
them to cook
Oil

METHOD

First, rinse your mung beans and then soak the rice and beans together for about 30 minutes. I did this by putting them in a bowl with water to cover.

I put about 2 Tbsp oil (I used olive) into the pan and, after it was hot, I dropped in the cumin seeds and let them fry until they crackled. Then I put in the chopped onion and let it soften until translucent. I added my spices after the onion was translucent and then stirred well. Then I drained my rice/beans and added them to the pot, with about 2 cups of water (you’re going to cook the rice/beans in this water, so make sure there’s enough, and check back to make sure you’re not burning the bottom of the mixture), which filled my pot as full as I wanted it. I didn’t want it too full, to avoid boiling over.

Bring this mixture to a gentle boil, stirring frequently, then cook for 20 – 30 minutes, or until rice and beans are nice and soft. Add the potatoes a little bit before the end and stir well.

This mixture can be either thick and mushy or have a runnier consistency like porridge – it’s up to you and how much water you add. If you notice that it’s turning out thicker than you’d like, add more water and stir!

I served this with curd (plain yogurt or raita) and it was yummy. I did find it a bit bland, which doesn’t surprise me in food for invalids, so I’m spicing it by the bowl. No photos, I keep eating it before I can take one. lol I’ll try again this evening.

Enjoy!


Leave a comment

Quinoa pudding in the rice cooker!

You may sense a trend here.

I’m having a season of stomach problems, and frankly all I want is to eat things that make me happy. Rice pudding makes me happy. 😉  However, when I posted my last rice pudding post, a friend who can’t eat rice asked me if it could be made with quinoa… so last night I tried it. I tried it in the rice cooker, because a couple of the quinoa pudding recipes I sought out used the words “bain marie”, and nothing makes me run faster than those two words. Shudder. I thought to myself, I bet it would work using the rice cooker, and so it did. Life is good, my friends. I BANNED THE BAIN MARIE!

It tastes good, although quinoa doesn’t soak up as much liquid as rice, so it was a little sloppier. However, I wanted to try the recipe with only one substitution, so I was prepared for that, and frankly, I don’t mind a bit. This morning it’s solidified and is properly “puddingy”.

If you’d like to make your own, follow the directions from the last post (linked above in the text) and just substitute 1 cup of well-rinsed quinoa. (In the interests of full disclosure, I did a typically crummy job of rinsing it, frankly: just swished it around in a colander lined with paper towel for a few rinses, then plopped it in the cooker. Just to be honest.) It doesn’t taste exactly the same as rice pudding, because the quinoa will contribute its own nutty taste (I often think of it as green), but it’s a very nice substitute if you’re looking to get more nutritional value out of your desserts or if you can’t eat rice.

Enjoy!


2 Comments

Another variant of rice pudding

Because seriously, who ever gets enough rice pudding? Sometimes, you’re just sitting around in the evening, and you think: “screw it. I need some rice pudding. Stat.” But who wants to stand around in front of the stove for 20 minutes? Sometimes, OK, me. But not this evening. So I made the hinkiest, quickest, and yet still yummy version of rice pudding ever. Ready?

  1. I put 1 cup of rice (all I had was Basmati, although I prefer a short or medium grain) in the rice cooker, with 1 cup of coconut milk, 1 cup of water, and two tablespoons of butter. Put that sucker on to cook, and waited for it to be done.
  2. As soon as it was finished (so while still hot), I moved it over into a large bowl.
  3. I added another cup of liquids, this time almond milk/coconut milk mixed. (It’s what I had)
  4. Stirred in about 1/2 cup of brown sugar, added cinnamon and ground cardamom.
  5. Chopped in 3 dates.

BOOM. Rice pudding.

IMG_6514


1 Comment

Aloo Palak, or spinach and potatoes

I had some spinach that needed to meet its Maker, and a couple of potatoes that were starting to think about becoming manky… so I searched for “spinach potatoes Indian” et voila! Here it is!

This recipe met a simple requirement: I had almost all the ingredients. I followed it pretty closely, except my potatoes refused to boil (the pan was too small and I was afraid of a turmeric boil-over, so I didn’t have them on high enough heat), so they eventually just got fished out of the pan and stuck in the microwave in a bowl on the “potato” setting. Sometimes simple is best, people. lol

A note to Celiacs and others following a strictly gluten-free diet: a lot of Indian recipes call for asafoetida, or hing. Almost all hing, from my research, seems to be cut with wheat flour. There’s one brand – I think it’s Frontier Naturals – that’s cut with rice flour instead of wheat, so that’s a very important consideration for us! Always ask at Indian restaurants if your meal will have hing in it before you order. Also, many hing labels I’ve seen in the past only list the asafoetida – not the wheat flour. So be careful!! I just leave it out of my cooking, because no amount of authenticity is worth the amount of illness that happens when I get glutened. :} One of the things I liked about this recipe is that it didn’t call for hing! 

http://www.food.com/recipe/aloo-palak-indian-potatoes-spinach-108787

INGREDIENTS

DIRECTIONS

  1. In a pan cook the spinach with garlic, ginger, onions and the green chilies for about 5-10 minutes. (I waited and added the chili powder at the end, with the other spices. Also, I cooked these in some ghee, although no oil is specified.)
  2. Remove from the pan and blend to a fine puree and keep aside. (I didn’t do this; I wanted to keep it chunky. I like chunky. lol)
  3. In the meantime boil the potatoes with salt and turmeric until done, apprximately 10 minutes and set aside when done. (Yeah. This totally didn’t happen. See note above)
  4. Heat ghee in a pan, fry cumin seeds along with spinach-onion paste and simmer for a few minutes. (You want the cumin seeds to crackle!)
  5. Add the cooked potatoes, garam masala, coriander and cumin powder and a little water if needed.
  6. Simmer for few minutes till the potatoes absorb the flavor.
  7. Add fresh cream if desired. (I didn’t, but I bet this would be delish.)

I made some jheera rice (recipe to come soon; in the meantime, you can find lots of recipes for this online!) and spooned a little of the aloo palak on top. Heavenly!!


In the pot!


I’m ready for my closeup


3 Comments

What’s In The Oven: Baked Pears With Cinnamon Honey

I’ve started trying some recipes for the holiday season, and I happened to pick up two beautiful Bartlett pears (seriously. They taste like champagne. It’s kind of a shame to bake them) at the market the other day, so I looked up some pear recipes. I’m also trying to stay away from sugar when I can (without making myself feel denied), so this recipe fit the bill perfectly.
https://blog.myfitnesspal.com/baked-pears-with-cinnamon-honey/

I just peeled, cut up, and cored my pears, then added two small Gala apples I had sitting by just for good measure. Simmered the butter, honey, vanilla, and cinnamon on the stove as requested (for this I used cassia, not ceylon, because I have more of it) and added about a half teaspoon of ginger for good measure. I spooned the sauce over the fruit in a baking pan and put it in a 400 degree oven and it’s in there now. I’ll let you know how it comes out.

Before cooking


UPDATE: Just came out of the oven and oooooommmmmggggg

It’s good

It’s really good

Did I mention it’s good?

Sorry, I can’t type any more because I’m eating now.


mmmnf


(sexy music plays)


2 Comments

Golden Milk (Turmeric Milk)

I’ve been drinking this mixture for a couple weeks now, and I really enjoy it. It seems to decrease my craving for sweets – somewhat sits in the place in my heart that I had reserved for the forbidden hot cocoa. I’ve also been feeling less achy in the joints, and my sprained ankle has definitely been improving a LOT since I’ve been drinking it. I’m following a recommendation that people with arthritis can try drinking it 2x day to start, as I have arthritis and also an injury. I know eventually I’ll have to cut it down to 1x day so I don’t turn yellow… but in the meantime, I’m going to enjoy it.

I’ve tried making this with several different kinds of milk: dairy (cow’s) milk, coconut milk, almond milk, no milk, all of these cut with water (when I’m running out of milk), and today I got a box of “Silk” almond + coconut milk, unsweetened, and am trying it. It’s delicious – all the rich sweetness of coconut milk without being as cloying (I tried full-fat coconut milk with the cream the first time and it was a bit too much). I actually found even this to be a bit rich, so I cut it about 60/40 with water (the 40 being the water).

There are many different “recipes” for golden milk out there. I’ll tell you what I’ve been doing and you can find your own groove, if you want to try it. :}  The consensus seems to be that adding freshly cracked black pepper to the turmeric helps the body use the active compounds in the turmeric more effectively, and same goes for a little oil or fat or some kind. When I was making this with cow’s milk, I figured I had the fat covered. But after I switched to almond milk, I thought: why not add a little oil?

I also wanted to make a turmeric paste to make the process easier, and there are several schools of thought on this as well. I combined a couple for this end result, as follows.

PS: Here’s the video that started me on this journey.

TURMERIC PASTE (my recipe)

Melt 3 tablespoons of coconut oil in a small saucepan
Add turmeric powder until it’s a loose paste
Crack in some black pepper
Add cinnamon, ginger, etc as you like (I usually add a pinch of ginger near the end)

Simmer this paste for about 9 minutes, stirring occasionally, to allow the turmeric to “cook” and release its active compounds into the oil. After 9 minutes is up, pour into a glass container (carefully) and store in the fridge for up to two weeks.

To make the golden milk: I “chip” off a little bit to put in milk in a saucepan, let it melt and heat with the milk, add a little honey to a cup, and then carefully pour the golden milk into a mug and drink it.

WARNING: turmeric will stain your clothes, counters, cupboards, sink if it’s porous, hands, and whatever you touch with it LIKE NOBODY’S BUSINESS. I’ve ruined a dishtowel. Your sponge will be oompa-loompa colored. Just so you know. Usually a little dab of baking soda and water on the counter will let you rub out the stains… but don’t take it for granted. Treat this like nuclear waste just to be safe.

Ok!! Enjoy drinking your golden milk!


Leave a comment

Kinda-veg rice pudding. Somewhat healthy. Ish.

😀 So I have a baby shower tomorrow, and I’d like to bring a dessert. But I’d like to make it with just things I have in the house, so it’s going to be mostly dairy-free and stuff. I’m starting with this recipe:

http://greatist.com/eat/recipes/healthier-rice-pudding

And going to add a couple things as I go. Eggnog, for one, because I’m making a double +  batch and I don’t have enough coconut milk. I bet that won’t suck. More after I’m done!!

Original Recipe:

4 Ingredients

  • 1 cup coconut milk (about 1/2 can)
  • 1 tablespoon agave or maple syrup
  • 1 cup cooked brown or white rice
  • Dash cinnamon

Directions

  1. Pour coconut milk into a small pot over medium-high heat. Bring to a simmer. Add agave and stir to combine. Add rice and continue to stir until evenly distributed.
  2. Let mixture simmer for about 5 minutes. Liquids should boil off and mixture will become thicker. Serve sprinkled with cinnamon.

More to come when I finish it!

What I really did:

I made a double batch of rice, which means about 8 cups of cooked rice. So obviously, there’s plenty of rice. To get 8 cups of liquid, I combined the following:

4 cups coconut milk (light)

2 cups eggnog

2 cups water

2+ Tbsp cinnamon (cassia, not Ceylon) – I like cinnamon a lot.

Ginger, nutmeg, and cardamom to taste

1/2 cup brown sugar

If you’ve ever wondered what this much rice pudding looks like, this is it.

 
Simmer the cooked rice in this mixture (probably in your largest pan) until it thickens up. Then try to find enough containers for that much delicious, delicious rice pudding. 😀


About this many!

 
Oh my gosh, is this good. And not *quite* as naughty as my normal recipe.

yusssss